
If you want to learn backend development in 2025, there’s one framework you shouldn’t overlook: ASP.NET Core 8. It’s fast, scalable, open-source, and backed by Microsoft. Whether you’re going to build APIs for enterprise apps or just experimenting with hobby projects, ASP.NET Core gives you the power to build modern web services — with performance that rivals Node.js and Go.
But let’s face it — most beginner tutorials stop at “Hello World” or echo boilerplate from Microsoft Docs.
At DebugBoat, we’re going beyond that.
In this hands-on guide, you won’t just create a web API — you’ll build, test, and deploy a working Book API using ASP.NET Core 8’s Minimal API style.
You will learn,
- What Is a Web API?
- Understand how the new .NET 8 structure works
- Create Your ASP.NET Core 8 Minimal API Project
- Deploy your app live — for free — using Azure App Service
By the end, you’ll have a working backend app, visible on the internet, and the confidence to build more.
We will build a simple, practical and lightweight Book API with the following features:
- GET /books : To fetch the list of books
- POST /books : To add new books
So, lets start with,
What Is a Web API?
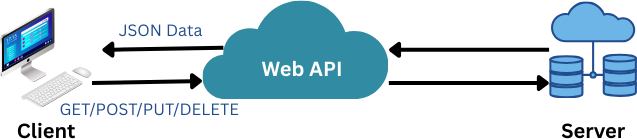
Web API stands for Web Application Programming Interface which makes possible two applications to talk to each other using the internet.
You can imagine Web API as an waiter in a restaurant. We go through the menu, select one or more items and ask the waiter for the same. The waiter takes that order, goes to the kitchen area and tells the chef to prepare the food we have requested. Then the waiter returns with the food we have ordered.
Understanding the New .NET 8 Structure
.NET 8 makes it quicker and easier to build web APIs, especially for smaller projects, by using a simpler style called Minimal APIs.
In older versions (.NET 5 or 6), you’d see a Startup.cs file, a more complex folder structure, and lots of boilerplate. But in .NET 8, with Minimal APIs:
- There’s no Startup.cs
- Everything is wired inside a single file — Program.cs
- The code is cleaner and more readable for beginners
Project Structure Breakdown
When we run,
dotnet new webapi -n BookApiIt will create the following file structure
BookApi/
├── Controllers/       (May not be used in Minimal APIs)
├── Program.cs         -> The entry point
├── Properties/
├── Book.cs            -> Your model (you’ll create this)
├── BookApi.csproj     -> Project file
└── appSettings.json   -> Configurations
Now lets discuss on the most important parts
Program.cs – Which is responsible for everything
This file does the following,
- App configuration
- Routing
- Dependency injection
- Middleware (like CORS, Swagger) [We will discuss on this later]
Programs.cs file looks like this
var builder = WebApplication.CreateBuilder(args);
var app = builder.Build();

app.MapGet("/", () => "Hello, DebugBoat!");

app.Run();
Isn’t it simple?
The next is appSettings.json
appSettings.json
This is where you define your app configuration like database connection strings, logging levels and more. For a sample, you can consider this,
{
  "Logging": {
    "LogLevel": {
      "Default": "Information",
      "Microsoft.AspNetCore": "Warning"
    }
  },
  "AllowedHosts": "*"
}
Now the Project file,
BookApi.csproj
Ideally the we don’t edit this manually unless we add libraries or change the framework. The csproj or Project file consists the following details,
- What SDK you’re using (
<TargetFramework>net8.0</TargetFramework>) - Any NuGet packages being used
- Build settings of the project
These are all the mandatory files required to run the project. Apart from these, class files are added with .cs extension as per requirement. For example,
- RegisterUser.cs
- AddBooks.cs
Okay, now we have understood the overall project architecture, lets create a simple example to get some hands-on
Create Your ASP.NET Core 8 Minimal API Project
We will be creating a Web API project – Book API
Please ensure that you have,
- .NET SDK Installed – Jut open Command Prompt/Power Shell/Terminal and type
dotnet --info - Visual Studio Code
If you have, just follow the steps below:
Open your terminal (Command Prompt, PowerShell, or Bash)
dotnet new webapi -n BookApi
cd BookApi
code .
A new ASP.NET Core 8 Web API project will be created in a folder named BookApi and the same will be opened in Visual Studio Code.
Now run the app using the following command,
dotnet runKeep eye on your output window and you will be seeing this,
Now listening on: https://localhost:5001
Application started. Press Ctrl+C to shut down.
Now open any browser and type this URL,
https://localhost:5001/swaggerGreat. So, now you have created your first .NET Web API project and you are able to run it. Next step is to deploy it on the cloud with the help of Azure App Services. Sounds interesting? Let’s dive in.
Deploying ASP.NET Core 8 API to Azure App Service
Here we will use the Azure Free F1 tier. If you face any problem regarding the Azure Subscription, put the same in the comment and I will try to sort it out.
We will use the Azure App Service. Wondering what is it?
Azure App Service is a PaaS (Platform as a Service) offering from Microsoft that lets you:
- Host web APIs and apps in the cloud
- Deploy directly from Visual Studio Code or GitHub
- Get a public HTTPS URL for your app instantly
There is one Extension for Visual Studio Code which makes it easier to deploy your app. Let’s go step by step.
Step 1: Install the Azure App Service Extension
- Open Visual Studio
- Go to the Extensions tab
- Search: “Azure App Service”
- Click Install
Similarly install Azure Account and C# for Visual Studio Code
Step 2: Sign In to Azure
Click on the Azure icon in the sidebar → Sign In and follow the instructions
Step 3: Deploy Your App
- Open your BookApi project in VS Code
- Right-click the project folder → Deploy to Web App
- Follow the prompts:
- Create a new Web App
- Choose a unique name: debugboat-bookapi
- Select runtime: .NET 8 (LTS)
- Choose region (closest to you)
- Select Free F1 tier
VS Code will automatically build and publish your app to Azure.
Step 4: Open Your Live API
After deployment, your app will be live at:
https://<your-app-name>.azurewebsites.net/swaggerNow your Book API Project has been deployed to Azure App Service, you can access the swagger link and test the endpoints